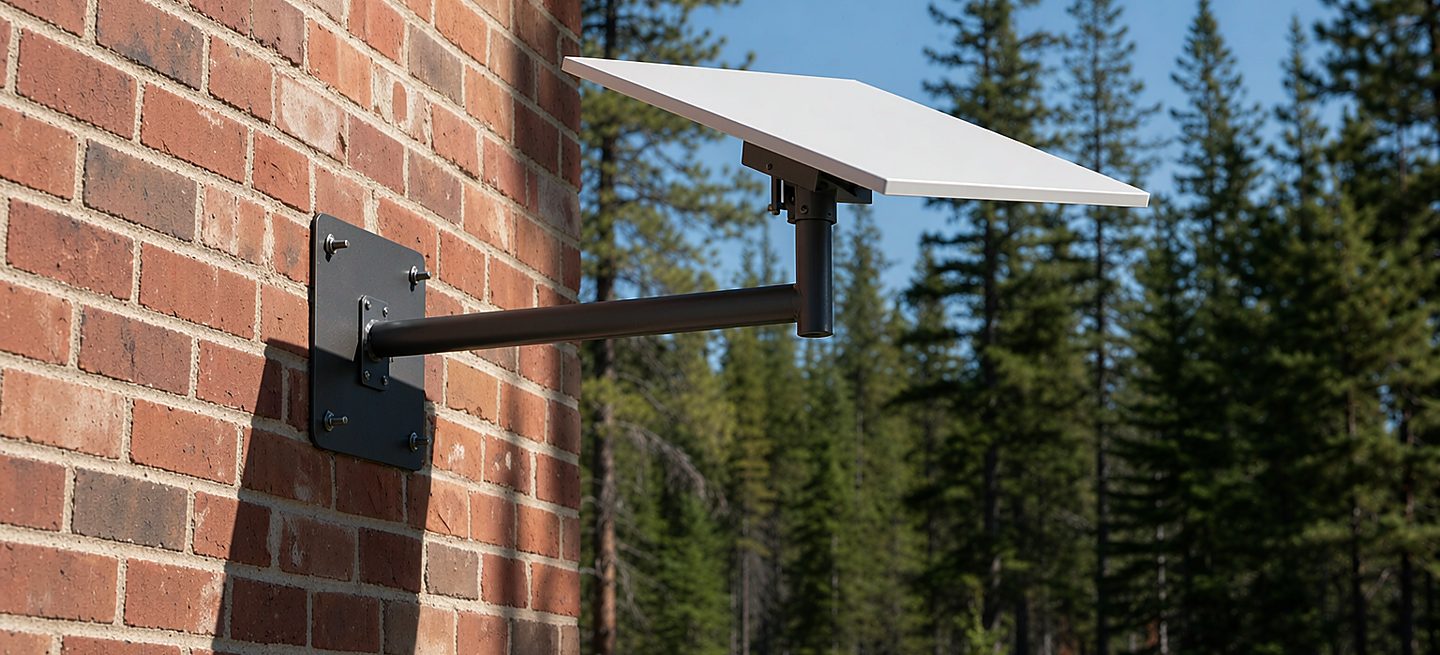
Short version: the wall, not the bracket, decides whether the install stays up. Solid brick and poured concrete take the anchors that come in the box; a brick veneer holds nothing in its air gap and needs the frame behind it; hollow block needs a chemical anchor or a toggle; stucco over foam holds nothing at all. Identify the wall with one pilot hole before you drill the other five, keep the load in solid units rather than mortar joints, and seal every hole the same day.
Every Starlink install photo shows the dish. Almost none of them show the plate bolted to the wall, which is where the install actually gets decided. A bracket is a lever, and the masonry is what the lever pulls against.
Brick is not one material. Solid brick, a one-brick skin with an air gap behind it, hollow block, and stucco over foam all look the same from the ground and behave nothing alike when you hang something off them. This page is about telling them apart before the drill comes out — and about what to do when the honest answer is not the anchor you were about to use.
The load is the arm, not the dish
Start with what the wall actually feels. The dish is light enough to lift onto a mast with one hand, so it is tempting to think the wall only has to carry that. It does not. Our wall bracket holds the mast 11 inches out from the wall face, and wind pushing on the dish is a horizontal force applied at the end of that arm. The arm multiplies it: the top of the plate is prised outward while the bottom is pressed in.
That is why "it is only a few kilos" is the wrong test, and why a fixing that holds a shelf is not automatically a fixing that holds a dish. A shelf pulls straight down along the wall. A dish on an arm tries to fold the plate off it. Everything below is about resisting that pull rather than about weight.
Five walls that look identical from the ground
| Wall | What is behind the face | What holds | Room for an 11 inch arm? |
|---|---|---|---|
| Solid brick | Two or more brick widths, load-bearing, usually pre-war | Sleeve anchors or masonry screws into the units | Yes — the best wall in this list |
| Brick veneer | A one-brick skin, a 1 inch air gap, then sheathing and studs | Only the frame behind it | Only if you can reach the frame |
| Hollow block | Concrete block with voids, sometimes grout-filled | A chemical anchor in a screen tube, or a toggle | Yes, with the right anchor |
| Stucco over block | Render on masonry | Drill through the render into the block | Yes |
| Stucco over foam | Render on insulation board, then sheathing | Nothing in the foam — reach the studs | No, not through the foam |
The thirty-second test, before you drill six holes
Drill one pilot hole where the plate's top anchor will go, and read what the bit does rather than what comes out of the hole.
- Steady resistance for three inches or more — solid masonry. You have the good wall; go on to the anchor section.
- Resistance, then a sudden soft or hollow patch — you have crossed a brick skin into the cavity. That is a veneer, and no expanding anchor will hold in the gap.
- Almost nothing, then something hard — foam board on sheathing. The render was the only thing you drilled.
Brick dust colour tells you very little. The feel of the bit tells you everything: a veneer gives itself away at the exact moment the resistance stops.
Why the veneer gap is the expensive mistake
A sleeve anchor holds by expanding against the sides of its hole. In a one-brick skin it expands through one inch of brick and then reaches air. It feels tight when you set it, because the expansion did happen — and then the whole assembly comes out of the wall with a piece of brick face attached, usually in the first windy week.
The ties holding a veneer to the house are corrugated straps sized for the veneer's own weight. They are not sized for a dish on an 11 inch lever, and treating them as structure is how a bracket becomes a masonry repair.
There are only two honest answers on a veneer wall: reach the frame with a long fixing that passes through the skin and the gap into the stud or structural sheathing, or put the dish somewhere else — the eave and fascia line usually still has solid timber. Wall versus eave works out which face of the house gives the view anyway, and the answer is often the eave, which sidesteps the whole problem.
Match the mechanism to the material
| You have | Use | Do not use |
|---|---|---|
| Solid brick | A sleeve anchor, or a masonry screw for lighter loads | Wedge anchors — their expansion concentrates at the tip and cracks brick |
| Hollow block | A chemical anchor in a screen tube, or a toggle through the void | A sleeve anchor — it expands into empty space and spins |
| Poured concrete | A wedge or sleeve anchor | Masonry screws, which are for brick and block |
| Stucco over block | Through the render, into the block, sealed | Anything that stops at the render |
| Timber, fascia, gable trim | Lag bolts into solid timber | Masonry anchors of any kind |
The bracket ships with six anchor points and both masonry and timber fixings in the box, which covers solid brick, block, concrete and timber. Hollow block is the one case where the box is not the answer — a void needs a chemical or a toggle, and no amount of tightening will change that. Send us a photo of the wall and we will tell you what to buy locally, even though it is not something we sell.
The mortar joint is not a hole
Mortar is the soft part of a brick wall, and it is also the part water uses. An anchor set in a joint has less material around it, a shorter life, and under a lever load it is the first thing to let go.
On a six-point plate the awkward part is coursing. A plate with holes at fixed spacing will not always land six solid units, and sometimes three of the marks sit in joints no matter how carefully you drill.
Two fixes that work. Move the plate up or down by half a unit and re-mark — a stagger of an inch or two often turns three bad marks into three good ones. If the geometry will not cooperate, fit a backer: a piece of exterior ply or steel plate wide enough to span units, fixed into the brick, with the bracket bolted to that. The load then travels through the backer into solid brick instead of into joints, and the plate hides the backer so nothing reads as improvised.
How tight, and how you know it held
Snug, then about a quarter turn, is the general safe zone for a masonry anchor: enough to expand the sleeve, not enough to crack the unit. Over-tightening is the more common mistake of the two, because a cracked brick looks perfectly fine from the outside and holds nothing.
You cannot proof-load an anchor without risking the wall, so the confidence has to come from the steps instead — right mechanism, right diameter, clean hole, full embedment behind the plate. If you want an actual test, drill one extra hole somewhere the plate will cover or a downpipe will hide, set a single anchor and lean your weight on it. That hole is cheaper than finding out at forty miles an hour of wind.
Water is the failure nobody notices for two winters
Brick is porous by design, and every hole you drill is a new way in. Seal each anchor individually, around its shank, with an exterior sealant — a neutral-cure sealant, or a penetrating silane or siloxane around the fixing. What you are not doing is smearing a bead around the whole plate: a sealed perimeter traps water behind the plate, which is worse than the hole you started with.
The damage is slow and it gets diagnosed as something else. Water sits in the hole, freezes, expands, and lifts the brick face off in a flake. Two winters later the anchor is loose in a spalled hole and the story becomes "the bracket failed", when the cause was an unsealed fixing on install day.
Seal on the same day, and in a freeze-thaw climate do not leave open holes overnight. The winter install guide covers the rest of the cold-weather side of that.
The other wall surfaces, briefly
Vinyl and aluminium siding are weather skins, not structure. The bracket has to reach the sheathing or a stud behind them, so the fixings are longer and the siding gets a small clearance hole rather than a crushed one. That skin has its own set of rules - a lap is a step rather than a surface, and the plate cannot sit on one - so it gets a page of its own. Wood siding is straightforward but you still want studs, not just the board. Metal siding takes sealed screws into the girt or framing it is fixed to, not into the sheet. None of these change the principle: find the structure, then choose the fixing.
When the wall says no
Some walls should not carry a lever at all, and the honest answer is to move the dish rather than to buy a bigger anchor.
- Mortar that scrapes out with a screwdriver. Soft or sandy mortar will not hold an expansion anchor, and it cannot be fixed from the outside.
- A brick face that is already spalling or painted over — the face is the part you need intact.
- Stucco over foam with no studs behind the plate position.
- A veneer wall whose studs do not line up with where the plate has to sit for the view.
- Any position where a dish would hang above a path, a door or a boundary. A mount that lets go should land on grass, not on someone.
In each case the install moves rather than the anchor: the eave, the roof, or the ground. The yard guide covers a freestanding install with no wall involved, and the roof install guide takes the penetration route when masonry is out.
The order that avoids rework
- Mark the plate, then look at all six marks before drilling. Confirm the view from the app at the same time — height and obstruction decides whether this spot is worth anchoring at all.
- Drill one pilot and read the substrate. One hole costs nothing; six in the wrong wall is a repair.
- Drill the rest to the anchor's stated diameter — one size, not the nearest bit in the drawer — and blow the dust out. A dusty hole is a loose anchor.
- Fix and seal as you go, one anchor at a time, so no hole is ever left open.
- Thread the dish on, tighten it, and re-check after the first real wind. Vibration settles joints in ways install day cannot predict.
That is the whole job: identify the wall, match the mechanism, keep the load in solid units, seal the holes. The rest of a wall install — which face, what height, where the cable goes — is decided before any of this, and the wall mount guide is the page that decides it.
FAQ
Can I mount a Starlink bracket on brick veneer?
Only if you can reach the frame behind the veneer. A veneer is a one-brick skin tied to the house with corrugated straps sized for its own weight, with an air gap behind it - expansion anchors open into that gap and pull out, usually in the first windy week. A long fixing through the skin and the gap into the stud or structural sheathing can work, if the geometry allows. If it does not, the eave or fascia is the better wall.
Do I need special anchors for brick?
For solid brick, the masonry anchors supplied with the bracket are the right type - a sleeve anchor expands along its length and spreads the load. Masonry screws suit lighter loads. Do not use wedge anchors in brick: their expansion is concentrated at the tip and is a common way to crack a unit. Hollow block needs a different mechanism entirely, a chemical anchor in a screen tube or a toggle.
How do I tell solid brick from a veneer?
Drill one quarter inch pilot where the top anchor will go and read the resistance. Steady resistance for three inches or more means solid masonry. Resistance that suddenly goes soft or hollow means you have crossed a brick skin into a cavity, which is a veneer. Almost no resistance at all, then something hard, means foam board on sheathing. The colour of the dust tells you much less than the feel of the bit.
Can I put the anchors in the mortar joints?
Not for a load on a lever. Mortar is softer than the brick and it is where water already travels, so an anchor there has less material around it and a shorter life. A six-point plate sometimes lands three of its marks in joints no matter how carefully you drill - move the plate up or down by half a unit and re-mark, or fit a backer plate spanning several units and bolt the bracket to that.
Will the anchor holes leak?
Only if they are left open. Seal each anchor individually around its shank with an exterior sealant on the same day, rather than smearing a bead around the whole plate - a sealed perimeter traps water behind the plate and does more damage than the hole. Unsealed holes let water in, freeze-thaw lifts the brick face off in a flake, and a couple of winters later the anchor is loose in a spalled hole.
Can I use the anchors in the box on hollow block?
No - the supplied fixings are for solid masonry and timber. In a hollow block a sleeve anchor expands into the void and spins, so it feels set and holds nothing. Use a chemical anchor with a screen tube, or a toggle through the void, or find a grout-filled cell. Send us a photo of the wall and we will tell you what to buy locally rather than sell you something that will not hold.
What if the brick is old and soft?
Then the wall is answering the question for you. If the mortar scrapes out with a screwdriver, or the brick face is spalling or painted over, that wall should not carry a dish on an eleven inch arm - no anchor size fixes soft material. Move the install to the eave, the roof or the ground. It is a cheaper decision than a masonry repair, and the view is usually easier to find on those surfaces anyway.
Wall Bracket
Six anchor points and 11 inches of reach, with masonry and timber fixings in the box - and a photo line if your wall turns out to be the awkward kind.